Blog 05 - Single axle car trailer build
Let me start out by saying, this project was not planned.
I've wanted a way to tow my drift car for years. Dealing with tow trucks from the track are expensive, and I've been there before. Owning one of those JDM flatdeck car carriers would be ideal, but they are hard to find here in BC - I almost snagged one last year but it got away from me!! Anyways, having some sort of reliable transport for the race car has always been a thought in my head. So when this super low deck trailer popped up for sale on the mainland, I jumped on it.
I knew very little about trailers at the time (do I sure know a lot now...), but this trailer seemed perfect for the smaller vehicle I'd be towing the FC with - a Rav4 V6 with 3500lb tow capacity. Soooo, I jumped on it and was on a ferry to pick it up the next day.
This thing was lowwwww:

A shot from behind:

I think it was around 5" off the ground in this state. The original guy who built it used it to tow his race car around.
I did what I thought any sane trailer owner should do - put the thing on jack stands and pulled the wheels off to inspect the brakes and bearings. After getting it off the ground, it didn't take long for me to figure out that this thing was a bit of a hack job

Crusty...
The thing that struck me was the construction of it - someone had welded on old GM front spindles off of a pickup truck or something, directly to the frame. They were stick welded very poorly, and it scared me a bit looking at it... I decided to pull off a hub and check the bearings to see what size they are and check the rating on them.

After digging through some charts, these were only rated at 1000lbs per hub, meaning the trailer was rated at only 2000lbs.... Judging by the fact it came with hydraulic brakes and larger wheels, I thought for sure it was rated for 3500 . Like I said, now I know a lot about trailers.... learned that the hard way!
Other weird things I found on the trailer:
- Odd 5x4.75 bolt pattern
- GM truck drum brakes
- Scabbed together using galvanized pipe and various c-channel pieces
- No bracing underneath the 3 plywood pieces

Picture above is how it looked under the decking.
At this point, I sat on the project for a while. It was definitely not safe to tow my drift car, and I was kinda bummed that it was going to need so much work. I contemplated selling it (to be honest, I probably should have just sold it lol...)
Around a month or 2 later (after finishing the paint job on the FC), I needed to do something about the trailer.
I set a goal to make the trailer safe to handle 3500lbs GVW (this would give me around 2750-2800lbs net weight), keep the trailer fairly lightweight (700lbs max), retain the hydraulic brakes for easy hookup, move the axle slightly back to help add a bit more tongue weight, raise the ride height a bit and modify the tongue to match this. So essentially, the goal was to build a new trailer...
I started ordering parts from various sources, trying to keep the rebuild budget to $500. I was able to sell the winch it came with, the old wheels, hubs, and brakes, so that made me back a bit of money.
Parts I purchased:
- New hydraulic brakes
- New drum hubs
- New wheels/tires
- Almost new 3500lb drop axle from marketplace
I also needed some steel to re-do the chassis, so I picked up some:
- 2x4x1/8 rectangular tube
- 3x3x3/16 square tube
I began by cutting out all the old internal structure - diagonal braces, those awful galvanized tube crossmembers, and the makeshift axle. I then spent probably 5-6 hours of straight grinding to clean up the insides of the c-channel where everything was welded on. Not entirely necessary, but I'm a perfectionist.

I never took a shot of the bare frame, but the pic above shows it with the notched 2x4 rectangular tubes installed. I straightened out the sides of the frame with an oxy-acetylene torch beforehand, and had to cut and re-weld one of the back corners to get it square.
I added the 2x4 rails for extra support, especially if transporting a heavy load that might need to be slid along the deck and put a lot of pressure in the middle. Luckily, the axle would just clear it:

With those 2x4 rails tack welded in place, It was time to think about the lateral supports. I was lucky to be able to re-purpose nearly all the c-channel I cut out earlier, and make something work of it:

The above photo is what I came up with. The cross supports were spaced 4ft apart; allowing me to re-use the 1" plywood deck it came with, and have the seams there. I re-did the diagonal supports a bit smaller than before.
I fully welded all that up, and things were looking nice.

All the braces were notched to sit flush with the top of the frame:

A look down the side shows as straight as I could get things:


Next up was getting the axle welded on. I looked at adding suspension, but it would have made the deck height too high. The only option would have been to go with a custom torsion setup, but they were really pricey.
I was definitely a bit worried about solid mounting the axle, and knew it would be super bouncy unloaded. After scouring the internet for hours, I found that the single axle race king trailers made in Australia are also suspension-less, so that eased my worries a bit. This thing will spend most of its time carrying vehicles, which, after all, have suspension to help cushion the bumps in the road a bit.

I settled on putting the axle centered on the frame - this moved it back 8" from where it originally was... Original owner must have been towing something very front heavy with it?
I used the trailer frame as a jig - I bought some new axle spring saddles from princess auto and tack welded these to the frame. Next, I laid the axle over the saddles, got it aligned, then tack welded them together. Then I just cut the tacks off the frame, fully welded the saddles to the axle, and it was ready to permanently install on the bottom of the frame.


Welded to the bottom:

Things were looking pretty sweet! At this point, I cut off the original tongue. Since the trailer was so low before, you may have noticed that the tongue was located about 8" higher than the deck. Since I raised the ride height a fair bit, I needed to re-do it.
I decided on just keeping it simple and level with the deck, so here's what it ended up like:


I was pretty happy with how things were looking at this point. Here's one more shot from the back:

The fenders were also re-installed at this point. I popped some riv-nuts into them and used (4) 1/4" bolts to mount each. They are supported with a small piece of angle iron welded to the frame.
At this point, it was ready to prep the frame for paint. After a few hours of scotchbrite scuffing and cleaning it up with the help of my lovely wife, it was ready to paint. Nothing fancy here, just some good old rustoleum grey I had lying around!
Before:

After:

We made sure to get everywhere inside and out, and applied 2 coats to the higher wear areas like the tongue and outside of the frame.
A look outside in the sun:

Holes for the deck screws were pre-drilled, then the plywood was sanded down and painted black:

I could now finalize the wiring and run the brake lines from the actuator to the wheel cylinders. I got lucky and was able to re-use the original galvanized brake lines, adjusting the bends to make them work. The original wiring harness was also in good shape and could be re-run using existing threaded holes in the frame.

Ran the brake line down the tongue and over past the new frame rail.

Along the gusset and into the c-channel.

Then down the frame to the axle. Here it went into a tee to feed both sides.

With that taken care of, on went the plywood decking:


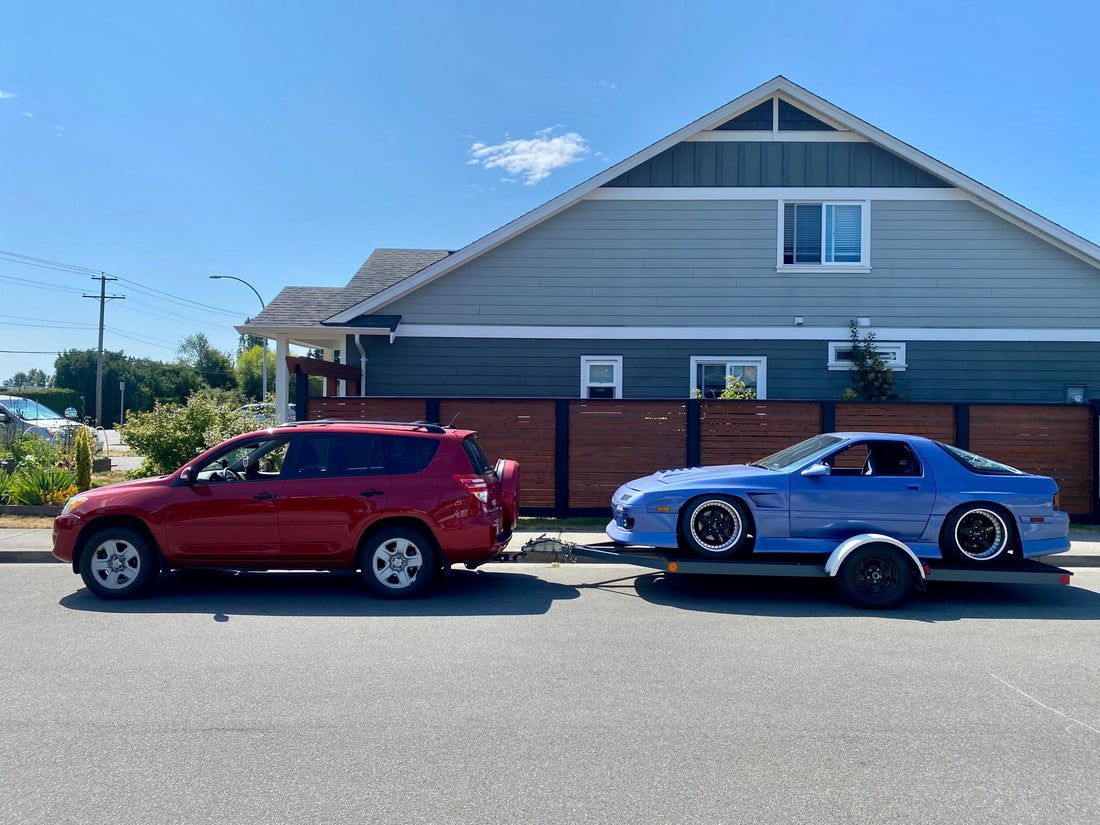
The fenders went on, brakes got bled a few days later, and it was right onto its first tow!

The trailer worked fantastic. As long as the weight is relatively balanced, and you have some weight over the tongue, it tows fairly smooth. The hydraulic brakes work great too. You notice the weight when accelerating, but not braking. The brakes really help to take the strain off the tow vehicle.
Some shots of the approach angle. The ramps came with the trailer, and are about 5 feet long.

Since these photos, I've backed the Rav4 up onto some ramps to get a lower approach angle. This made loading my FC a breeze:


Thanks for reading!